Android SDK で, LinearLayout の動作を確認してみた. [プログラム三昧]

ヒマも無いのに, Android SDK に手を出してしまいました.
LinearLayout というオブジェクト
Android SDK では,画面構成を「リソース」という外部情報で規定しています.「リソース」は,XML形式で記述されます.そのため,プログラム本体を変更することなく,見た目を変更することができます.
いくつかの部品を横一列,縦一列に配置するためのコンテナとして, LenarLayout というオブジェクトが用意されています.このコンテナも,「リソース」にちょちょいと書くだけで,簡単に配置できます.
weight を指定すると子どもが大きくなる
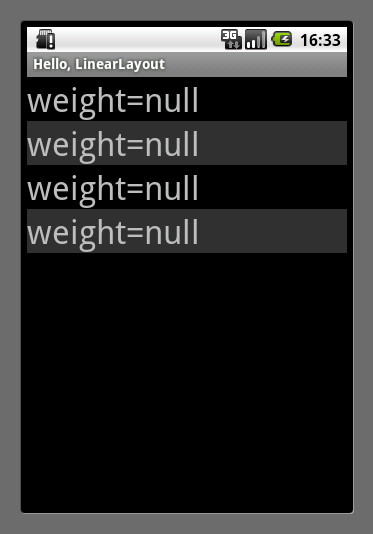
LinearLayout は,子部品を収納するためのコンテナです.収納した結果,場所が余ることもあります.そんな時には,残った場所には空白が残ります.この例では,4個の TextView 部品を縦に並べています.
<?xml version="1.0" encoding="utf-8"?>
<LinearLayout xmlns:android="http://schemas.android.com/apk/res/android"
    android:orientation="vertical"
    android:layout_width="fill_parent"
    android:layout_height="fill_parent">

    <TextView
        android:text="weight=null"
        android:textSize="15pt"
        android:layout_width="fill_parent"
        android:layout_height="wrap_content"
        />
    <TextView
        android:text="weight=null"
        android:textSize="15pt"
        android:background="#333333"
        android:layout_width="fill_parent"
        android:layout_height="wrap_content"
        />
    <TextView
        android:text="weight=null"
        android:textSize="15pt"
        android:layout_width="fill_parent"
        android:layout_height="wrap_content"
        />
    <TextView
        android:text="weight=null"
        android:textSize="15pt"
        android:background="#333333"
        android:layout_width="fill_parent"
        android:layout_height="wrap_content"
        />
</LinearLayout>
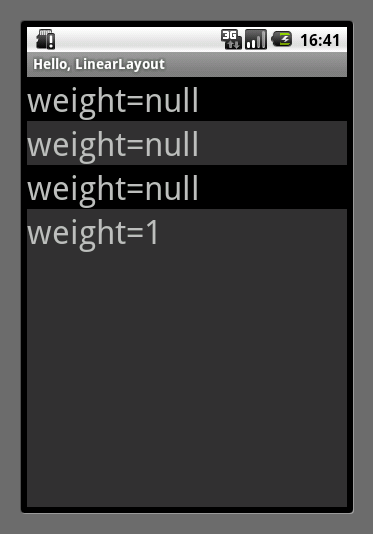
余った部分いっぱいに子部品を広げたいこともあるでしょう.そんな時には, weight 属性で,「どの部品に残り部分を占有させたいか.」を指定することができます.この例では,余った部分を4行目の部品に占有させるために,4行目だけに weight=1 を与えています,
<?xml version="1.0" encoding="utf-8"?>
<LinearLayout xmlns:android="http://schemas.android.com/apk/res/android"
    android:orientation="vertical"
    android:layout_width="fill_parent"
    android:layout_height="fill_parent">

    <TextView
        android:text="weight=null"
        android:textSize="15pt"
        android:layout_width="fill_parent"
        android:layout_height="wrap_content"
        />
    <TextView
        android:text="weight=null"
        android:textSize="15pt"
        android:background="#333333"
        android:layout_width="fill_parent"
        android:layout_height="wrap_content"
        />
    <TextView
        android:text="weight=null"
        android:textSize="15pt"
        android:layout_width="fill_parent"
        android:layout_height="wrap_content"
        />
    <TextView
        android:text="weight=1"
        android:textSize="15pt"
        android:background="#333333"
        android:layout_width="fill_parent"
        android:layout_height="wrap_content"
        android:layout_weight="1"/>
</LinearLayout>
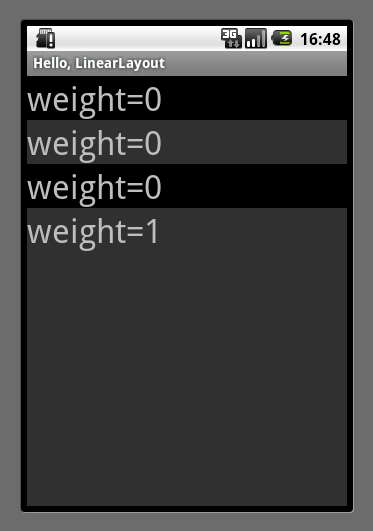
ちなみに, weight のデフォルトは, "0" です.以降の例では, weight を明示的に指定します.
<?xml version="1.0" encoding="utf-8"?>
<LinearLayout xmlns:android="http://schemas.android.com/apk/res/android"
    android:orientation="vertical"
    android:layout_width="fill_parent"
    android:layout_height="fill_parent">

    <TextView
        android:text="weight=0"
        android:textSize="15pt"
        android:layout_width="fill_parent"
        android:layout_height="wrap_content"
        android:layout_weight="0"/>
    <TextView
        android:text="weight=0"
        android:textSize="15pt"
        android:background="#333333"
        android:layout_width="fill_parent"
        android:layout_height="wrap_content"
        android:layout_weight="0"/>
    <TextView
        android:text="weight=0"
        android:textSize="15pt"
        android:layout_width="fill_parent"
        android:layout_height="wrap_content"
        android:layout_weight="0"/>
    <TextView
        android:text="weight=1"
        android:textSize="15pt"
        android:background="#333333"
        android:layout_width="fill_parent"
        android:layout_height="wrap_content"
        android:layout_weight="1"/>
</LinearLayout>
weight の数値は,子供の取り分を表す
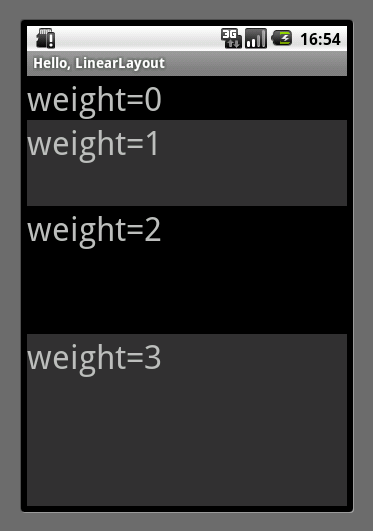
weight を使って,余った部分を占有する子部品を指定することがわかりました.では,複数の子部品に weight を付けたらどうなるでしょうか.この例では,4個の部品すべてに異なる weight を指定しました.すると, weight の大きい子部品ほど広い領域を占有することができるようになりました.オンライン・マニュアルによると,占有する領域の広さは, weight に指定した値に比例するのだそうです.
<?xml version="1.0" encoding="utf-8"?>
<LinearLayout xmlns:android="http://schemas.android.com/apk/res/android"
    android:orientation="vertical"
    android:layout_width="fill_parent"
    android:layout_height="fill_parent">

    <TextView
        android:text="weight=0"
        android:textSize="15pt"
        android:layout_width="fill_parent"
        android:layout_height="wrap_content"
        android:layout_weight="0"/>
    <TextView
        android:text="weight=1"
        android:textSize="15pt"
        android:background="#333333"
        android:layout_width="fill_parent"
        android:layout_height="wrap_content"
        android:layout_weight="1"/>
    <TextView
        android:text="weight=2"
        android:textSize="15pt"
        android:layout_width="fill_parent"
        android:layout_height="wrap_content"
        android:layout_weight="2"/>
    <TextView
        android:text="weight=3"
        android:textSize="15pt"
        android:background="#333333"
        android:layout_width="fill_parent"
        android:layout_height="wrap_content"
        android:layout_weight="3"/>
</LinearLayout>
子部品が fill_parent を宣言した場合
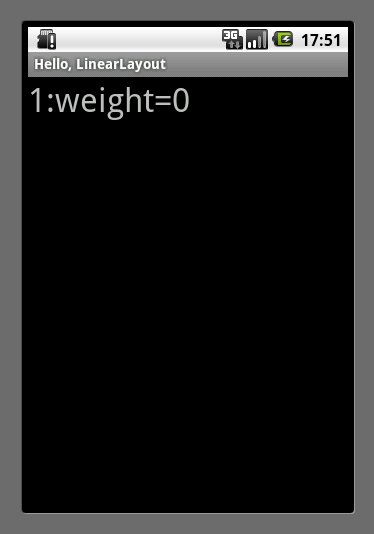
さて,ここまでは,マニュアル通りに動作することがわかりました.この時,すべての小部品には, height 属性として wrap_content が付いています.これは,「私に必要な分だけください」という意味です.そこで,すべての属性を fill_parent として,「持ってるだけ出せ」に変更してみます.まずは,すべての weight を "0" にした場合です.この場合,余った領域のすべてを子部品が分けあうのか,と思ったら,一行目の部品が独り占めしてしまいました.
<?xml version="1.0" encoding="utf-8"?>
<LinearLayout xmlns:android="http://schemas.android.com/apk/res/android"
    android:orientation="vertical"
    android:layout_width="fill_parent"
    android:layout_height="fill_parent">

    <TextView
        android:text="1:weight=0"
        android:textSize="15pt"
        android:layout_width="fill_parent"
        android:layout_height="fill_parent"
        android:layout_weight="0"/>
    <TextView
        android:text="2:weight=0"
        android:textSize="15pt"
        android:background="#333333"
        android:layout_width="fill_parent"
        android:layout_height="fill_parent"
        android:layout_weight="0"/>
    <TextView
        android:text="3:weight=0"
        android:textSize="15pt"
        android:layout_width="fill_parent"
        android:layout_height="fill_parent"
        android:layout_weight="0"/>
    <TextView
        android:text="4:weight=0"
        android:textSize="15pt"
        android:background="#333333"
        android:layout_width="fill_parent"
        android:layout_height="fill_parent"
        android:layout_weight="0"/>
</LinearLayout>
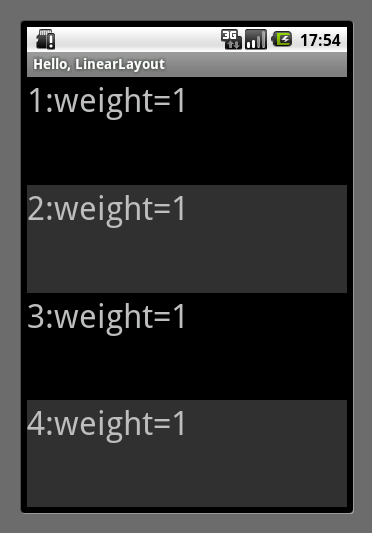
今度は,すべての子部品の weight を "1" にしてみました.すると,四つの子部品で余った領域を分け合うようになりました.あれ?何でこうなるの?ちなみに,すべての weight を "2" にしても,同じ結果が得られました. "0" だけが,特別なんですか?
<?xml version="1.0" encoding="utf-8"?>
<LinearLayout xmlns:android="http://schemas.android.com/apk/res/android"
    android:orientation="vertical"
    android:layout_width="fill_parent"
    android:layout_height="fill_parent">

    <TextView
        android:text="1:weight=1"
        android:textSize="15pt"
        android:layout_width="fill_parent"
        android:layout_height="fill_parent"
        android:layout_weight="1"/>
    <TextView
        android:text="2:weight=1"
        android:textSize="15pt"
        android:background="#333333"
        android:layout_width="fill_parent"
        android:layout_height="fill_parent"
        android:layout_weight="1"/>
    <TextView
        android:text="3:weight=1"
        android:textSize="15pt"
        android:layout_width="fill_parent"
        android:layout_height="fill_parent"
        android:layout_weight="1"/>
    <TextView
        android:text="4:weight=1"
        android:textSize="15pt"
        android:background="#333333"
        android:layout_width="fill_parent"
        android:layout_height="fill_parent"
        android:layout_weight="1"/>
</LinearLayout>
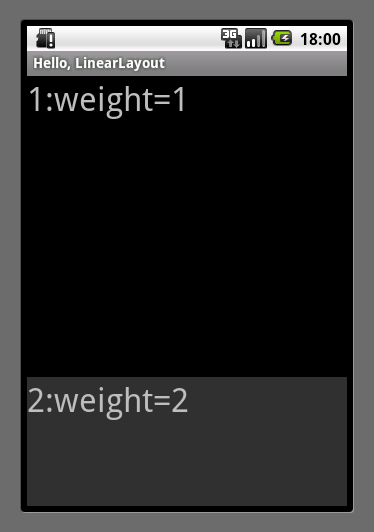
そこで,四つの子部品に "1" から "4" までのそれぞれ別の値を与えてみました.すると, weight に与えた値が小さいほど占有する面積が大きくなり, weight が大きいものは,表示もされないという, wrap_content の場合とは逆の結果が得られました.どうなってるの?
<?xml version="1.0" encoding="utf-8"?>
<LinearLayout xmlns:android="http://schemas.android.com/apk/res/android"
    android:orientation="vertical"
    android:layout_width="fill_parent"
    android:layout_height="fill_parent">

    <TextView
        android:text="1:weight=1"
        android:textSize="15pt"
        android:layout_width="fill_parent"
        android:layout_height="fill_parent"
        android:layout_weight="1"/>
    <TextView
        android:text="2:weight=2"
        android:textSize="15pt"
        android:background="#333333"
        android:layout_width="fill_parent"
        android:layout_height="fill_parent"
        android:layout_weight="2"/>
    <TextView
        android:text="3:weight=3"
        android:textSize="15pt"
        android:layout_width="fill_parent"
        android:layout_height="fill_parent"
        android:layout_weight="3"/>
    <TextView
        android:text="4:weight=4"
        android:textSize="15pt"
        android:background="#333333"
        android:layout_width="fill_parent"
        android:layout_height="fill_parent"
        android:layout_weight="4"/>
</LinearLayout>
という,疑問を呈したところで,この記事は終わりです.オチは,ありません.また,機会があったら,調べてみます.
参考サイト
- Hello, Views → Linear Layout
- この記事は,一連の Hello, Android 例題集のパラメータを変更していて見つけた疑問をもとにしています.
- Common Layout Objects → LinearLayout
- 各種 Layout オブジェクトに関するマニュアルですが,ここに書いてある記述と,実際の動作は違っているように見えます. LinearLayout を入れ子にした場合に,どのような動作になるか,子部品の状態によって動作が異なってくるというのは,困りませんか?
2010-03-07 18:12
nice!(0)
コメント(0)
トラックバック(0)


コメント 0